
 But here's the problem, I've already bought some...but sadly they're gone already - but the craving is still there but how am I not surprised? But it's OK, I 'll admit to it. I have no willpower whatsoever when it comes to Thin Mints or Lemonades or Samoas. I could eat a whole box of those suckers in one sitting. And I know I'm not the only one...
And I've tried to have Bryce hide them...but I find them.
And I've tried to freeze them in "correct" portions...but I eat them. All.
So obviously I have a problem but I'm OK with that.
I've looked for Girl Scouts left and right but they have seemed to have deserted Yucaipa and left us hanging onto an unhappy cookie free existence. Now as much as I want to support the GS troops, a girl's gotta look out for herself and her wants and needs. And since I know what I want, and I know what I need, here is what I plan to do!
And while your at it check out Baking Bites because it's super and I love it and it's what you should do.
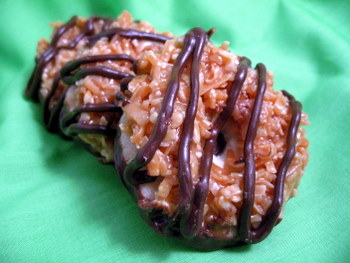
Homemade Samoas
Cookies
1 cup butter, soft
1/2 cup sugar
2 cups all purpose flour
1/4 tsp baking powder
1/2 tsp salt
1/2 tsp vanilla extract
up to 2 tbsp milk
Preheat oven to 350F.
In a large mixing bowl, cream together butter and sugar. Mix in flour, baking powder and salt at a low speed, followed by the vanilla and milk, adding in the milk as needed to make the dough come together without being sticky (it’s possible you might not need to add milk at all). The dough should come together into a soft, not-too-sticky ball. Add in a bit of extra flour if your dough is very sticky.
Roll the dough (working in two or three batches) out between pieces of wax paper to about 1/4-inch thickness (or slightly less) and use a 1 1/2-inch cookie cutter to make rounds. Place on a parchment lined baking sheet and use a knife, or the end of a wide straw, to cut a smaller center hole. Repeat with remaining dough. Alternatively, use scant tablespoons of dough and press into an even layer in a mini donut pan to form the rounds.
Bake cookies for 10-12 minutes, until bottoms are lightly browned and cookies are set. If using a mini donut pan, bake for only about 10 minutes, until edges are light gold.
Cool for a few minutes on the baking sheet then transfer to a wire rack to cool completely.
Topping
3 cups shredded coconut (sweetened or unsweetened)
12-oz good-quality chewy caramels
1/4 tsp salt
3 tbsp milk
8 oz. dark or semisweet chocolate (chocolate chips are ok)
Preheat oven to 300. Spread coconut evenly on a parchment-lined baking sheet (preferably one with sides) and toast 20 minutes, stirring every 5 minutes, until coconut is golden. Cool on baking sheet, stirring occasionally. Set aside.
Unwrap the caramels and place in a large microwave-safe bowl with milk and salt. Cook on high for 3-4 minutes, stopping to stir a few times to help the caramel melt. When smooth, fold in toasted coconut with a spatula.
Using the spatula or a small offset spatula, spread topping on cooled cookies, using about 2-3 tsp per cookie. Reheat caramel for a few seconds in the microwave if it gets too firm to work with.
While topping sets up, melt chocolate in a small bowl. Heat on high in the microwave in 45 second intervals, stirring thoroughly to prevent scorching. Dip the base of each cookie into the chocolate and place on a clean piece of parchment paper. Transfer all remaining chocolate (or melt a bit of additional chocolate, if necessary) into a piping bag or a ziploc bag with the corner snipped off and drizzle finished cookies with chocolate.
Let chocolate set completely before storing in an airtight container.
Makes about 3 1/2-4 dozen cookies.
Note: These cookies are fairly time consuming to make, but if you take your time and have fun with them, the results will be worth it. That said, if you want something a little bit quicker, try baking a batch of Samoas Bars instead, which require no rolling and cutting of the dough!
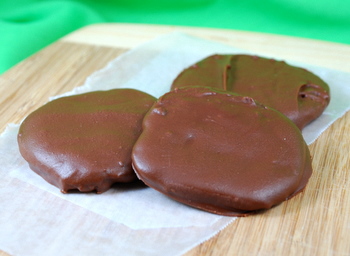
Homemade Thin Mints
2 1/4 cups all purpose flour
1/4 cup cornstarch
6 tbsp unsweetened cocoa powder
1/2 tsp salt
1 cup white sugar
1/2 cup butter, room temperature
1/3 cup milk (any kind)
1/2 tsp vanilla extract
3/4 tsp peppermint extract
In a small bowl, whisk together flour, cornstarch, cocoa powder and salt.
In a large bowl, cream together butter and sugar. With the mixer on low speed, add in the milk and the extracts. Mixture will look curdled. Gradually, add in the flour mixture until fully incorporated.
Shape dough into two logs, about 1 1/2 inches (or about 4 cm) in diameter, wrap in plastic wrap and freeze for at least 1-2 hours, until dough is very firm.
Preheat oven to 375F.
Slice dough into rounds not more than 1/4 inch thick - if they are too thick, they will not be as crisp - and place on a parchment lined baking sheet. Cookies will not spread very much, so you can put them quite close together.
Bake for 13-15 minutes, until cookies are firm at the edges. Cool cookies completely on a wire rack before dipping in chocolate.
Dark Chocolate Coating
10-oz dark or semisweet chocolate
1/2 cup butter, room temperature
In a microwave safe bowl, combine chocolate and butter. Melt on high power in the microwave, stirring every 45-60 seconds, until chocolate is smooth. Chocolate should have a consistency somewhere between chocolate syrup and fudge for a thin coating.
Dip each cookie in melted chocolate, turn with a fork to coat, then transfer to a piece of parchment paper or wax paper to set up for at least 30 minutes, or until chocolate is cool and firm.
Reheat chocolate as needed to keep it smooth and easy to dip into.
Makes 3 1/2-4 dozen cookies.
Oh no! These recipes could be dangerous for me. I too have already polished off 2 boxes of GS cookies, and I should be on a diet. I ask Spencer to hide my cookies too, but I want them hidden from the kids, not me! :)
ReplyDeleteNo Way!!! I love you!! Thanks for posting these recipes. I am totally making these ASAP, well maybe not ASAP but soon.
ReplyDeleteI am so going to try these recipes!
ReplyDelete